Learn from Code

Buy Now

Tuesday, May 12, 2009

How To Add “Read More” in Blogspot


Step #1 - Update Your Template Code


First you need to edit your existing code so I recommend copying and pasting it into notepad or any text editor. Also, it’s smart at this point to create a backup of your template just in case something goes wrong. Now do a search (CTRL + F) within the text editor for the following code post-header-line-1. This is the default code that Blogger includes but some custom templates remove or change this code so you might have trouble finding it. If you can’t locate this text then try searching for <data:post.body/> instead. Your template will for sure have this since it’s the tag that actually prints the body of your post.


Now depending on which code you were able to find will determine how easy the next steps will be. You might need to do some detective work first in order to get this working properly in your custom template. The idea is to get this new code into your template before the <data:post.body/> tag. Keep reading and hopefully the explanation will illustrate the concept clear enough so you are able to adapt this hack to your custom template.

Add the following code below the <div class=’post-header-line-1′/> and <div class=’post-header-line’> tags if you’ve got both.

<b:if cond='data:blog.pageType == "item"'>
<style>.
fullpost{display:inline;}</style>
<p><data:post.body/></p>
<b:else/>
<style>.fullpost{display:none;}</style>

Yes, there are supposed to be two </b:if> tags in the above code so don’t think it’ s a mistake. The result should look like this:


This code will be the same no matter what template you are using. Just make sure it goes below the <data:post.body/> as shown in the image above.

Now let’s look at what the final result should be. Here’s the updated code block you just worked on all put together:
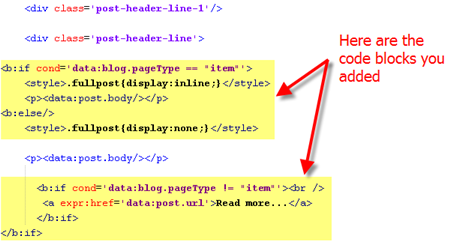


Ok, you’re all done editing the template code. Paste it back into your Blogger html window and save it. If you get an error, you made a mistake. The most common mistake is to accidentally delete a &gt; or < while pasting in the new code. If it saved successfully, it’s time to move onto the next step and modify a quick Blogger format setting.

Step #2 - Add a Class Tag in Your Default Post Template

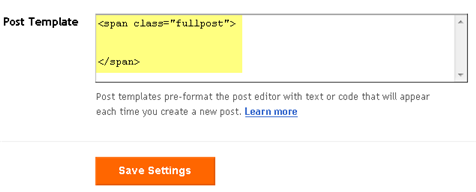
For this step, you need to navigate in your Blogger account to "Settings" => "Formatting" and scroll all the way down to the bottom. It’s the last option called "Post Template". You’re going to paste in the following code:

<span class="fullpost">

</span>

You’ll want to keep the spaces in there which will make sense later. After you save this, it will look like this:


Step #3 - Create a New Post

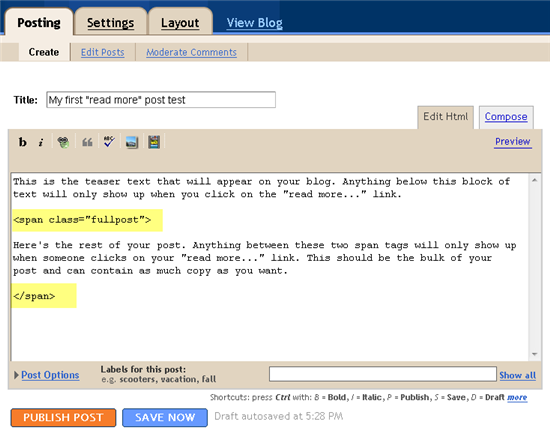
Ok, we’ve got everything all setup so it’s time to go and test it out. Hopefully you’ve got a new post in mind for your blog. If not, then we’ll just create a test post which you can later delete. When you cl ick on the “Posting” tab, you’ll notice that the post text area is now pre-populated with the <span class=”fullpost”> and </span> tags. If not, then you didn’t save it properly so go back and re-read step #2.

So when writing your new post, anything you put above the <span class=”fullpost”> tag will be the teaser text. The main body of your post needs to go in between the <span class=”fullpost”> and &lt;/span> tags in order for the “read more…” link to work properly. See the screenshot below. Sometimes pictures illustrate better than words.


Now publish or preview your post to see the “read more” hack working on your blog. If it doesn’t show up for some reason, go back and run through the steps again. Most likely you pasted the code blocks in the wrong places. It’s difficult to troubleshoot these issues since each template can be unique so please make sure to double-check your template before asking for help in the comments section below.

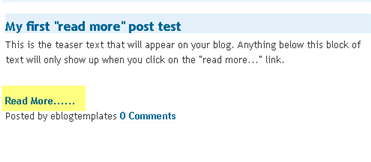
Here’s the live post with the “read more…” link properly working based on the text I used above in the post text area.
Additional Info

If you want to go back and update your old posts with this new “read more…” feature you can. Just go back and edit each post manually. Essentially you’ll need to paste in the <span class=”fullpost”> and </span> tags breaking apart the post into two parts.

For some posts, you might not want to use this feature at all. If that’s the case, just delete the <span class=”fullpost”> and </span> tags from within your new post text area. Then your new post will show up entirely just like it used to before you implemented.

Reference:
http://www.eblogtemplates.com/how-to-add-the-blogger-read-more-expandable-posts-link/


Read more...

Thursday, May 7, 2009

Create login


An application that are uses by many user, need a better security level to it. One of the security level on the application is a login screen. In this tutorial, I will try to introduce on creating a login screen to an application that are create it with visual basic.NET 2005. This codes is not a clean code and still have many bugs into it, so if anyone can create a better login screen/better code writing, please write me an e-mail at coojack@gmail.com, and I will update this post.

Let start with some basic, create a database login.mdb with table Users


Now open visual studio.net 2005 and create a new project called login. Before we do anything else, first of all move the database we just created into the folder of login project. Move the database into folder login\login\bin\debug
Ok continue, Change the properties of form1.vb :

BackColor LightBlue
Font+ Microsoft Sans Serif, 8.25pt, Style=Bold
FormBorderStyle Fixed3D
Text Login
Name F_Login
StartPosition CenterScreen
ControlBox FALSE
ShowInTaskbar FALSE

Add 2 labels, 2 textboxs and 2 buttons with properties :

Label1
BackColor LightBlue
Font+ Microsoft Sans Serif, 8.25pt, style=Bold
Text Username

Label2
BackColor LightBlue
Font+ Microsoft Sans Serif, 8.25pt, style=Bold
Text Password

Textbox1
BorderStyle Fixed3D
Name txtUser

Textbox2
BorderStyle Fixed3D
Name txtPassword
PasswordChar *

Button1
BackColor LightBlue
Font+ Microsoft Sans Serif, 8.25pt, style=Bold
Flatstyle Flat
Text Login
Name btnlogin

Button2
BackColor LightBlue
Font+ Microsoft Sans Serif, 8.25pt, style=Bold
Flatstyle Flat
Text Cancel
Name btnbatal

After finish changing every properties for the forms and controls, now add one more form and change the name into F_Menu.vb.

Now, before we hit into the code, first of all, lets create a module to connect between database and application. Create new module and change its name to DataConnection.vb. Write this code to DataConnection.vb :

Imports System.Data Imports
System.Data.OleDb

Namespace
AccessData
Public Class DatabaseConnection Dim conect As New OleDbConnection("Provider=Microsoft.Jet.OLEDB.4.0;Data Source=" + Application.StartupPath + "\Login.mdb;")
Public Function open() As OleDbConnection

conect.Open()

Return conect

End Function

Public Function close() As OleDbConnection

conect.Close()

Return conect

End Function
End Class

End Namespace


After that, create another module, and change its name to Module.vb. Write this code in it :

Module _Module
Public intResponse, msg As Integer

Public Username, Password As String

End Module


After all the module have been created, lets fill the F_login form with code :

Imports System.Data
Imports System.Data.OleDb
Public Class F_Login

#Region "Deklarasi"
Dim myConnection As New AccessData.databaseconnection
Dim objconnection As OleDbConnection
Dim objcommand As OleDbCommand
Dim objdataadapter As OleDbDataAdapter
Dim objdatareader As OleDbDataReader
Dim strsql As String
Dim objdataset As New DataSet
Dim objdatatable As New DataTable
Dim F_Menu As New F_Menu
#End Region

#Region "Sub"
Sub CekUser()
objdatatable.Clear()
strsql = ("SELECT * FROM Users WHERE username= '" & Trim(txtUser.Text) & "'")
objcommand = New OleDbCommand
objcommand.Connection = myConnection.open
objcommand.CommandType = CommandType.Text
objcommand.CommandText = strsql
objdataadapter = New OleDbDataAdapter(objcommand)
objdataadapter.Fill(objdataset, "MDT_user")
objdatatable = objdataset.Tables("MDT_user")
myConnection.close()
End Sub
Sub Find_user()
objcommand = myConnection.open.createcommand
objcommand.CommandText = ("Select username, password From users where username='" & Trim(txtUser.Text) & "'")
objdatareader = objcommand.ExecuteReader
objdatareader.Read()
Username = objdatareader.Item("username")
Password = objdatareader.Item("Password")
myConnection.close()
End Sub
Sub login()
Try
'Mencari data user berdasarkan Username yang dimasukkan pada txtuser
CekUser()
'tidak boleh mengkosongkan username & password
If txtUser.Text.Trim() = "" And txtPassword.Text.Trim() = "" Then
MsgBox("Masukan Username dan Password", MsgBoxStyle.OkOnly, "POS")
txtUser.Focus()
ElseIf txtUser.Text = "" Then
MsgBox("Masukan Username ", MsgBoxStyle.OkOnly, "POS")
txtUser.Focus()
ElseIf txtPassword.Text = "" Then
MsgBox("Masukan password ", MsgBoxStyle.OkOnly, "POS")
txtPassword.Focus()
Else
'jika username dan password tidak kosong, maka program akan mengecek
'apakah data yang dicari tersedia pada objDataTable.
'Jika Tidak (baris data = 0 ) maka akan keluar pesan
'bahwa username tidak ada
If objdatatable.Rows.Count <= 0 Then
MsgBox("Username tidak ada ", MsgBoxStyle.OkOnly, "POS")
txtUser.Focus()
Else
'jika data yang di cari ada, maka program akan mencari password
'berdasarkan username yang dimasukkan.
Find_user()
'jika password yang di masukkan salah atau tidak sama
' dengan yang ada pada tabel, maka akan keluar pesan dari program
If Password <> Trim(txtPassword.Text) Then
MsgBox("Password salah!", MsgBoxStyle.OkOnly, "POS")
txtPassword.Focus()
Exit Sub
Else
'Jika benar program akan menampilkan pada form utama
'Me.ShowInTaskbar = False
Me.Hide()
F_Menu.ShowDialog()
txtUser.Text = ""
txtPassword.Text = ""
End If
End If
End If
Catch When Err.Number <> 0
MsgBox("Tidak dapat melakukan proses" & vbCrLf & Err.Description)
MyConnection.close()
End Try

End Sub
#End Region

Private Sub btnBatal_Click(ByVal sender As System.Object, ByVal e As System.EventArgs) Handles btnBatal.Click
intResponse = MessageBox.Show("Apakah anda mau keluar dari program?", Me.Text, MessageBoxButtons.YesNo, MessageBoxIcon.Exclamation)
If intResponse = MsgBoxResult.Yes Then
End
Else
Exit Sub
End If
End Sub

Private Sub btnLogin_Click(ByVal sender As System.Object, ByVal e As System.EventArgs) Handles btnLogin.Click
login()
End Sub
End Class


Read more...